Setup and Troubleshooting Guide
ARC One / ARC Air / ARC Pro not counting laps
How to troubleshoot C7039 digital lap counter
Lane change 'flipper' fails to operate
We recommend truing the tyres, even on new cars. To do this, hold the rear tyres against sandpaper whilst revving the car. This will remove any unevenness from the moulding process and increase the contact area with the track to improve grip performance.
Light cleaning of the track surface is recommended for daily use. Disconnect power before proceeding with any cleaning or maintenance.
Dry track before reconnecting power. We recommend using a damp cloth. This removes light grime and dust from the track surface. Wipe surface dry after using a damp cloth. As a matter of good practice, always do this before using the Scalextric layout as this will help ensure you get the best grip from the car tyres.
Use a mild abrasive material to shine up the running surfaces of the pick-up rails, making sure that the male and female connections at the ends of the track sections are also bright and shiny.
If the track is tarnished (dull) or has rust spots, all you need to do is give the metal parts, around the affected area, a quick clean. I personally use a PECO PL-41 Rail Cleaner Rubber. Click here to purchase. They are amazing and you will need one after every few times of usage to keep the rails shiny for maximum performance. Alternatively you can give it a rub with very fine sandpaper, although this isn't recommended but will be sufficient for just the once.
If you have a circuit and the car isn't running round, a method to find out which pieces of track are affected is just to join one piece of track to the powerbase track and run a car on it. You don't need a circuit.
If you are experiencing slippy tyres, try swapping the front tyres for the rear tyres. You can also add extra weights inside the car or extra magnets.
Cars keep stopping 
2) The car is correctly located in the slot of the track.
3) Both braids are making good contact with the track rails.

Track Problems
Here are some solutions:
Keep the track as flat as possible.
Make sure there is no carpet fluff or debris between each track piece.
Make sure each track piece firmly locates with the next piece.
Keep the track clean. Clean both the rails and connectors after every few times of use or when you notice a reduction in speed.
Track Cleaning
🚫 What NOT to UseWD-40 (leaves residue)
⚡ After Restoration – Protect the Rails
Track Connectors
Improve connections
Disconnect all track from the power base track. First, test the powerbase track own its own. If that is working well then connect the affected piece of track to the powerbase track. When testing track, if you wish, you don’t need a full circuit, just a piece of track connected to the powerbase track.
Next. Drive a car forward at a slow speed. When the car crosses from the powerbase track to the next piece of track, there should not be a drop in speed.
If there is a drop in speed, then fix the track connection: Disconnect both track pieces (the track piece immediately before and after the fault). Turn them over on a hard flat surface. Using a screwdriver, or similar, press down the metal tabs of the rails ensuring that they are fully pressed and clamped down to the plastic. This holds the rails in place more securely.
Reconnect the repaired track pieces and retest by placing the car at the powerbase and drive the car slowly, until you meet the next reduced or lost power section.
Continue the above repair process until full power is restored to all pieces of track.
If you feel the above process is not sufficient, you can go a step further: Using small pliers, slightly pinch the square box ends of the rails to squeeze the sides inwards slightly. This will make an interference for the connectors, so there is a slight bite when they engage. Do not squeeze too tight or you will not be able to reconnect the track.
Finally, run a Scalextric track power booster cable around the track and make connections to the track every couple of meters or so. Just search on the word ‘boost’ on our website.
If your Scalextric cars have a bumpy ride or struggle because the cars have ground out then the answer is to flatten the Scalextric track pieces. This can be done by leaving the track under heavy books overnight. Or you can reverse the bow in the track a little at a time over the edge of a table, until the track is visibly flat again. Be careful not to push too hard because then it will cause a kink in the rail and this is more difficult to restore. A kink will need reshaping by pushing it, at all angles, with a screwdriver, or similar until it is straight again.
1. Check the Power Supply
Ensure the power supply is properly connected to the powerbase and the wall socket.
Verify the plug and wires for any signs of damage or loose connections.
If you have another compatible power supply, try swapping it to see if the issue persists.
2. Inspect the Track Connections
Ensure all track pieces are securely connected and free of dirt or debris. Poor connections can cause resistance and dimming lights.
Gently clean the metal rails on the track using a soft cloth or a track cleaning tool.
3. Examine the Cars
Check if the cars' braids (contacts) are clean and properly aligned with the track. Dirty or misaligned braids can affect power distribution.
Test the powerbase light without the cars on the track to rule out car-related issues.
4. Overload Protection
If too much current is being drawn, the powerbase light may dim as a protective measure. Ensure you're not running more cars than the system is designed to handle.
If you're using modified or high-powered cars, they may draw more current than the powerbase can supply.
5. Test Without Accessories
Disconnect any additional track, accessories or digital components attached to the powerbase to see if they are causing the issue. You don't need a circuit to test, just the powerbase on its own will suffice.
6. Reset the Powerbase
Turn off the powerbase, unplug it, and let it rest for a few minutes. Reconnect it and check if the issue is resolved.
If none of the above steps work, there may be a fault with the powerbase itself. Please contact us.
Quick setup C8435 ARC Pro

Basic digital setup of the ARC Pro without the APP
Gently pull trigger to test connection.
ARC Pro setup guide video: Click Here
Read in conjunction with safety information Click Here for safety information.
ARC One / ARC Air / ARC Pro not counting laps
If your Scalextric ARC PRO isn’t counting laps, it’s almost always a track-sensor or setup issue. Here’s a structured way to diagnose it, from most common to less obvious causes. Please follow the above setup guide in conjunction with the official quick start guide before proceeding.
The ARC Pro uses infra-red (IR) sensors in the finish line section to detect each car’s guide blade as it passes. If the sensor doesn’t see the blade properly, the lap won’t be counted.
The original ARC Pro powerbase v0.3 doesn't like the Lane Change button pressed as you pass the sensors - you might miss a lap. Please see our help page to determine which version you have.
Make sure you are using Standard Scalextric Digital cars for testing the following:
1. Check the Powerbase Lane Sensor (most common)
ARC PRO counts laps using the infra-red (IR) sensor in the powerbase, not the app itself.
What to do:
Remove the powerbase from the layout
Turn it upside down and inspect the small sensor window underneath
Clean it gently with:
A dry microfiber cloth
Or a cotton bud lightly dampened with isopropyl alcohol
🚫 Dust, carpet fibres, or tape residue can block the sensor.
2. Track orientation and connection
Make sure the powerbase is installed the correct way round
Ensure all track tabs are fully clicked together
No raised joints near the powerbase — even a slight lift can stop lap detection
Make sure there is at last one full length straight section of track before the power base (i.e. not a curve). The longer the better. This is to ensure the car straightens up before passing the start/finish sensors
Avoid placing lane changers or pit entry pieces near to the powerbase.
Tip: Rebuild just a simple oval with the powerbase and test laps there.
3. Car guide and magnet height
The sensor needs a clear interruption underneath the car.
Check:
Guide blade fully seated (not riding too high) - The blade doesn’t sit fully in the slot (e.g., car body is a bit high or off-centre), so the sensor doesn’t trigger.
Magnet not missing or dislodged
Excessively worn tyres or lifted braid can raise the car too much
If you have non-Scalextric cars, they’re especially prone to this.
A typical problem is if the car’s guide blade is not black — some colours like blue, red, white or translucent can let IR through, so the sensor misses the car.
Fixes:
✔ Use cars with black guide blades only — they reflect IR best so laps are registered reliably.
✔ If you must use other guides, paint them black or replace them with Scalextric-brand black guides.
✔ Make sure each car runs straight over the sensor, not sideways or drifting, especially right at the finish line.
4. Braids (very common)
Flattened or dirty braids can cause the car to “float”.
Fix:
Clean braids with contact cleaner or alcohol
Gently fan them out so they make solid contact with the rails
5. ARC PRO firmware and app
Ensure the Scalextric ARC app is up to date
Power off the base completely for 30 seconds, then restart
Re-pair cars in the app
If the app connects but laps don’t count, it’s almost never Bluetooth — it’s physical detection
Start again - Reinstall the app. Wipe all of the previous settings and register one car with one controller
If you’re using the ARC app (or a third-party like SmartRace), laps might not register for software reasons:
Some users report laps simply not being recorded during races but work fine in practice sessions.
Certain apps can have bugs or misinterpreted lap counts, especially on some Android/iOS devices.
Race pausing due to phone interruptions (notifications, calls) can stop lap counting — the app may not resume counting while paused.
Fixes:
✔ Make sure you’re using the latest version of your race app.
✔ Avoid screen interruptions during races (turn on do not disturb).
✔ Try alternative apps like Magic ARC or SmartRace to see if the problem persists.
6. Test with another car
If one car counts laps and another doesn’t, the issue is the car
If no cars count laps, suspect the powerbase sensor
Single-car slow test (important):
Use one car only
Drive slowly over the finish line several times
Results tell us a lot:
Counts every time → issue is speed, drift, or layout
Counts sometimes → guide/sensor alignment
Never counts → guide colour or faulty sensor
7. Powerbase fault (less common)
Signs:
No lap counts from any car
Sensor visibly clean
Cars run normally
At this point:
Try a factory reset (if supported)
Quick diagnostic checklist
✅ Sensor clean
✅ Track fully seated
✅ Braids clean & spread
✅ Magnet present
✅ Guide seated properly
✅ Tested on simple layout
If you have methodically stepped through every item above and are still having issues then please contact us and let us know:
Are any laps counted at all, or none?
Do both lanes fail?
How to troubleshoot C7039 digital lap counter

1) First, from the layout that you are testing the lap counter with, turn the power base over and look at the underside. If it says 'AZ1', then proceed to step 2. If it says 'A', unplug it, as it will not work due to being incompatible - This is a digital lap counter and 'A' means you have an analogue setup. If the power base says ARC Pro on the top then this lap counter will not work. Any other letters, please contact us.
2) Just connect the lap counter to the power base on its own. No other track. The power base is the piece of track that has the mains lead and throttles plugged into it. You should see the numbers light up on the lap counter. This means it is working.
Flashing random numbers occasionally
It might be worth having a look at your braids. Make sure that they are not too splayed out or sticking up. Also give you track a good clean with a vacuum as you might have little bits of braid lurking in the track recesses causing the track to short (bits of metal bridging the pair of metal rails).
The lap counter misses laps occasionally
Check the guide fins of the cars. If they are worn or not deep enough, they may not trigger the lap counter sometimes. The sensors in the track should pick up the car ID from the cars LED as it passes over, so you may need to clean the LED if it has become dirty. Check your braids as these can raise the nose of the car. If they are raising the car too much, it will not sit in the groove correctly. If none of these work, please contact us again with an exact description of the fault and which set it is being used with. Photos are very helpful.
Fried Chips

Scalextric chips or DPR plugs or Scalextric Digital Plugs C8515 are used in digital slot cars to control speed and lane changes. A chip will 'fry' if too much current passes through it. If you are frying chips, these may be the reasons why...
Short Circuits: If there is a short circuit in the car or track, it can cause an excessive current to flow through the chip, leading to overheating and damage. See our information on track maintenance with regard to shorts. To avoid car short-circuits: be careful of any metal-on-metal contact inside the car and crossed wires.
Overvoltage: Applying a higher voltage than what the chip is rated for can cause it to overheat and fry. Ensure the power supply is within the recommended range for your Scalextric setup.
Poor Ventilation: If the chip does not have adequate ventilation, it can overheat during operation, leading to failure. Make sure there is enough airflow around the chip.
Electrical Noise: Excessive electrical noise or spikes on the track's power lines can damage sensitive electronic components in the chip. Suppress electrical noise from the car’s motor. Suppress electrical noise from TVs and radios too. These can result in the cut-outs, intermittent issues, and ID changes.
Incorrect Installation: Incorrect installation of the chip, such as improper soldering or placement, can cause it to malfunction or short circuit.
Physical Damage: Physical damage to the chip, whether from impact or mishandling, can lead to internal failures. Avoid revving the motor when the car is unable to move. This increases the current draw significantly.
This means:
Gently true the tyres
Avoid pushing crashed cars out of the way
Don’t hold the car on the track whilst pressing the throttle
If the car gets stuck in the track, stop and fix the issue
Static Electricity: Static discharge during handling can damage electronic components. Always handle chips with care, ideally using anti-static precautions.
Customised cars: If a car has been altered then this may affect the chip. For example: Increasing magnetic down-force by using stronger / extra magnets or lower-profile tyres, will add to the strain on the motor and draw more current through the chip. If the car’s ferrite choke (ferrite man) and
capacitor has been removed, this may affect the chip.
The latest C8515 Revision H Digital Plugs have a much higher current tolerance than the older versions. Revision H also has a higher tolerance than the C7005 & C7006 retro fit chips.
To summarise: To prevent chips from frying, ensure proper installation, use the correct voltage, provide adequate ventilation, and handle with care. Additionally, using quality components and maintaining the track and cars can reduce the risk of electrical issues.
Lane change 'flipper' fails to operate
Disconnect all track and extra accessories. Check that the rail connections are all as per the above process called ‘track problems’.
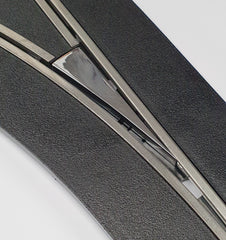
Check that there is no debris or obstructions in the slot, preventing the flipper from physically moving. It should 'flip' freely.
Ensure the track piece hasn't been bent (for example, trodden on or installed on a non-flat surface).
Reconnect the track piece and turn the power on.
Manually move the flipper into the position which would cause the car to change lane. Manually push a car over the track lane change sensor (this is a round hole about one car length before the flipper). The flipper should flip back to the 'straight ahead' position.
You don’t need a full circuit to do these tests. You don’t even need a small circuit but it helps to make life easier in having the car keep running around to test different combinations. You can just have the powerbase and the lane change track to test for any issues.
If the track behaves correctly, add back each component one at a time (track, boosters, other accessories) until it reappears.
Lane changing is solely controlled by the in-car chip. The chip is always transmitting the "straight ahead" code. Once the button is pressed on the controller, the car will transmit the lane change signal.
The lane changers will only 'flip' when the sensor is triggered by the Infra-Red LED of the car’s digital chip. When a digital car passes the sensor, it will either open or close the flipper, depending on whether the lane-change button of the controller is pressed or not.
Unexpected lane changes can happen if one car is following another car too close, when it lane changes, so the flipper doesn't have time to re-set. Try hanging back from the car in front by six-inches or so.
The LED might fail to trigger the sensor because the lane changer is immediately after a corner and the car is not straight. Try the lane change track after a straight piece.
If the sensor in the lane changer is dirty, give it a blow and/or a wipe with a clean cotton bud. Also the LED in the car may be dirty so give that a clean with the cotton bud too. The car’s LED may be damaged so it is worth testing with another car.
Try different cars and manually push the car over the sensor and see if the flipper moves. Try different controllers.
The lane changers are powered from the track, so the track connections do need to be good. For further information on how to make good connections, see further up this page.
Once you have tested the lane change track in isolation and it is working but you insert it back into the layout and it doesn’t perform as expected, it could be because it is on a very long track and therefore power taps are necessary. Or, if the problem lane changer is a long way from the powerbase, the power may be insufficient. One C7024 / P9300 power supply will run four cars, two are required for five or six. You may need two power supplies when running three cars.
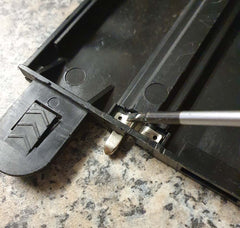
If the track has been bent slightly, it can cause the flipper to come out of its holder , causing the flipper to move well in one direction but not in the other. This means the solenoid link pin has become detached and the only option is to repair it. Remove the track from the circuit and open up the track underneath and see if this is the case.
Finally, a more advanced fault/repair is where a small self-resetting fuse fails. This results in the lane changer becoming completely dead or erratic in its operation. The ‘polyfuse’ has a 0.5Amp rating, typically labelled ‘LF050’ with board-level white silk screen printing as ‘R6’. If the fuse fails then it needs to be replaced and this requires some basic electronics / soldering repair skills.
Health & Safety
When fixing Scalextric cars and tracks, safety is crucial to prevent accidents and damage to the components. Here are some detailed safety tips to follow:
Disconnect Power: Always ensure the track is unplugged and the power is turned off before you start working on the cars or track to avoid electrical shocks.
Use Proper Tools: Use appropriate, well-maintained tools designed for small electronic repairs, such as precision screwdrivers, pliers, and soldering irons.
Work in a Clean, Organised Area: Keep your workspace tidy and free from clutter. This reduces the risk of losing small parts and helps avoid accidents.
Handle Components with Care: Handle electronic components, especially chips, with care to avoid static electricity damage. Use anti-static wristbands or mats if possible.
Follow Instructions: Always refer to the manufacturer's instructions for any repairs or modifications. Incorrect procedures can damage your Scalextric components.
Soldering Safety: When soldering, work in a well-ventilated area to avoid inhaling fumes. Use a proper soldering iron stand and always turn off the iron when not in use.
Be cautious of hot soldering irons and molten solder to prevent burns.
Check for Short Circuits: After repairs, check for any potential short circuits in the wiring. This can prevent chips from frying and other electrical issues.
Inspect Components: Regularly inspect cars and tracks for any signs of wear or damage. Replace worn-out parts to ensure the system runs smoothly and safely.
Avoid Overloading: Do not overload the track or cars with excessive power. Stick to the recommended voltage and current ratings to avoid frying chips and other components.
Secure Loose Wires: Ensure all wires are securely connected and insulated properly to prevent accidental short circuits or loose connections that could lead to overheating.
Use Protective Gear: Wear safety glasses when cutting or soldering to protect your eyes from flying debris and solder splashes.
Proper Ventilation: Ensure proper ventilation for electronic components, especially chips, to prevent overheating during operation.
Avoid Overheating: Do not operate the cars continuously for long periods without breaks, as this can lead to overheating and damage.
By following these safety tips, you can effectively fix and maintain your Scalextric cars and tracks while minimising the risk of accidents and component damage.
Please refer to manufacturer's guide for full and current information.
actionslotracing@gmail.com

